[:en]Often, you want to control an Arduino using a button. Fortunately, connecting a button is straightforward, and the Arduino IDE even provides a pre-made sketch that you can find under
Examples -> 02.Digital -> Button.
Here is the source code:
[code]
/*
Button
Turns on and off a light emitting diode(LED) connected to digital
pin 13, when pressing a pushbutton attached to pin 2.
The circuit:
* LED attached from pin 13 to ground
* pushbutton attached to pin 2 from +5V
* 10K resistor attached to pin 2 from ground
* Note: on most Arduinos there is already an LED on the board
attached to pin 13.
created 2005
by DojoDave
modified 30 Aug 2011
by Tom Igoe
This example code is in the public domain.
http://www.arduino.cc/en/Tutorial/Button
*/
// constants won’t change. They’re used here to
// set pin numbers:
const int buttonPin = 2; // the number of the pushbutton pin
const int ledPin = 13; // the number of the LED pin
// variables will change:
int buttonState = 0; // variable for reading the pushbutton status
void setup() {
// initialize the LED pin as an output:
pinMode(ledPin, OUTPUT);
// initialize the pushbutton pin as an input:
pinMode(buttonPin, INPUT);
}
void loop() {
// read the state of the pushbutton value:
buttonState = digitalRead(buttonPin);
// check if the pushbutton is pressed.
// if it is, the buttonState is HIGH:
if (buttonState == HIGH) {
// turn LED on:
digitalWrite(ledPin, HIGH);
}
else {
// turn LED off:
digitalWrite(ledPin, LOW);
}
}
[/code]
In addition to an Arduino, you’ll need a button and a resistor. The resistor connects pin 2 to ground, pulling the voltage at the pin to 0V. When you press the button, the pin is connected to the supply voltage (5V), and the voltage at the pin quickly rises to 5V. This voltage change is detected by the Arduino and can be read using the digitalRead function.
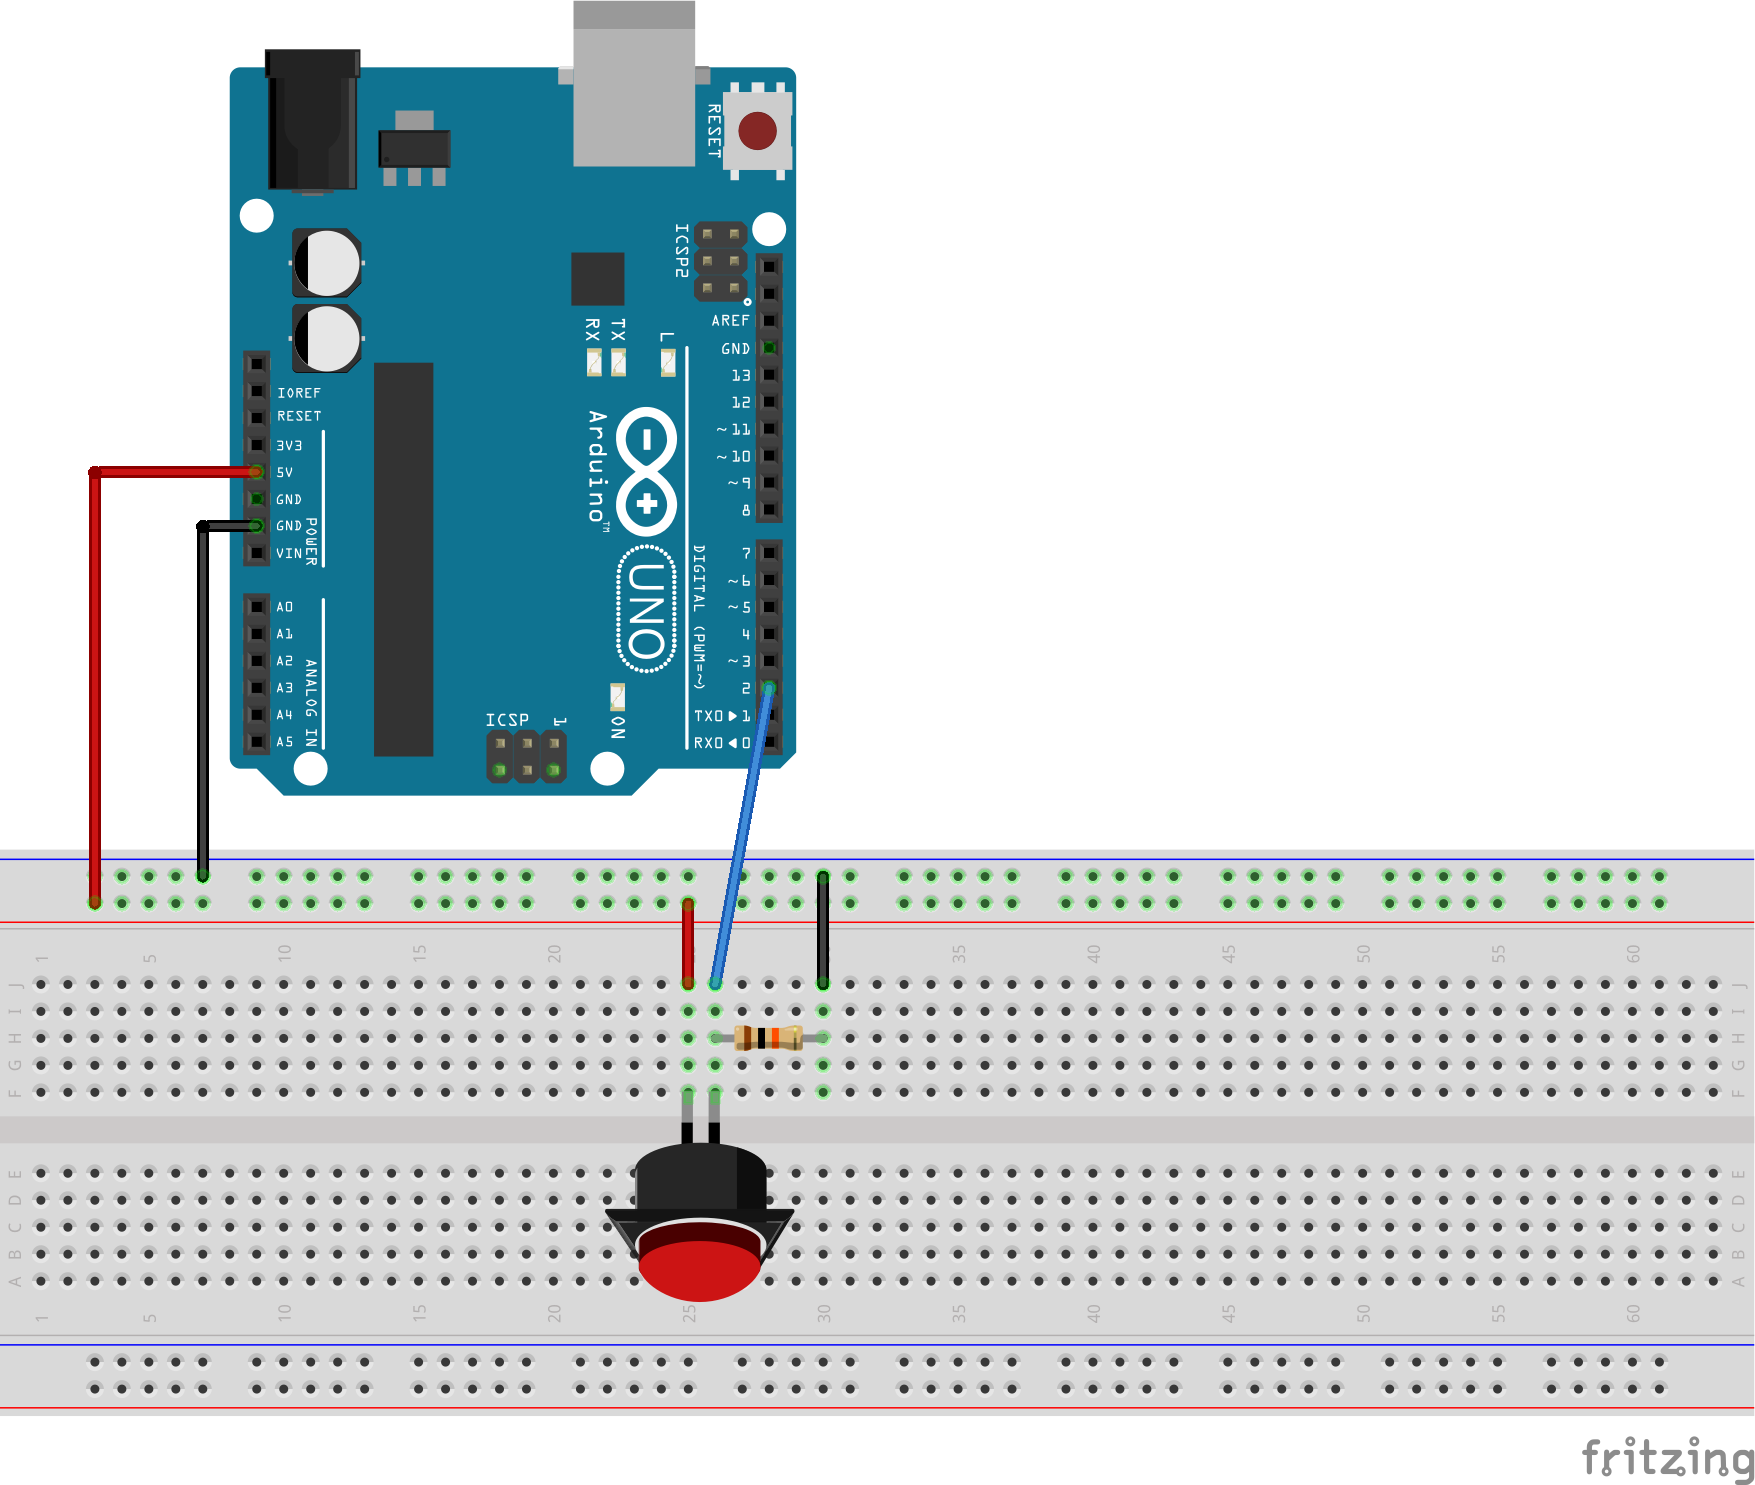
The sketch sets pin 2 to input mode and pin 13 to output mode. Pin 2 is where the button is connected, and on the Arduino, there’s already an LED built into pin 13. In the loop, it continuously checks the state of pin 2 using digitalRead. The variable buttonState is then set to 0 or 1, depending on the value digitalRead returns. If buttonState is set to 1, the LED is turned on; otherwise, it’s turned off..
Single Button Presses
However, this doesn’t allow toggling between on and off states with a single button press. To achieve this, you can use the following code:
[code]
/*
Button
Turns on and off a light emitting diode(LED) connected to digital
pin 13, when pressing a pushbutton attached to pin 2.
The circuit:
* LED attached from pin 13 to ground
* pushbutton attached to pin 2 from +5V
* 10K resistor attached to pin 2 from ground
* Note: on most Arduinos there is already an LED on the board
attached to pin 13.
*/
// constants won’t change. They’re used here to
// set pin numbers:
const int buttonPin = 2; // the number of the pushbutton pin
const int ledPin = 13; // the number of the LED pin
// variables will change:
int buttonState = LOW; // variable for reading the pushbutton status
int buttonread = 0;
void setup() {
// initialize the LED pin as an output:
pinMode(ledPin, OUTPUT);
// initialize the pushbutton pin as an input:
pinMode(buttonPin, INPUT);
Serial.begin(9600);
}
void loop() {
// read the state of the pushbutton value:
buttonread = digitalRead(buttonPin);
// check if the pushbutton is pressed.
// if it is, the buttonState is HIGH:
if (buttonread == HIGH) { //Check if Button was pressed before and being pressed now
if (buttonState == LOW)
{
// turn LED on:
digitalWrite(ledPin, HIGH);
buttonState = HIGH;
Serial.println("Button pressed");
}
}
else {
if (buttonState == HIGH) {
digitalWrite(ledPin, LOW);
buttonState = LOW;
}
}
}
[/code]
- At the beginning,
buttonStateis initialized toLOW. This variable keeps track of whether the button has been pressed before, andLOWindicates that it hasn’t been pressed yet. - The code then uses
digitalReadto check the button’s state. IfbuttonStateis already in theLOWstate, the LED is turned on,buttonStatechanges toHIGH, and we receive a message via the Serial Port using theSerial.printlncommand. Even when releasing the button, the LED remains on. - If you press the button again,
buttonStateis already in theHIGHstate, and theelse ifcondition is met and executed. Within this condition,buttonStateis set back toLOW, and the LED is turned off.
In essence, this works, but…
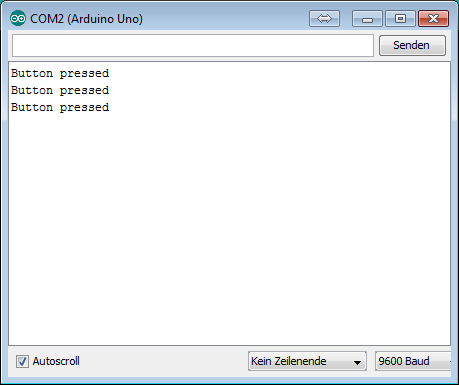
The image above, for example, is after a single button press. What happened?
Bouncing
When you press the button, you close the electrical circuit, but this doesn’t happen instantly. The mechanical components inside the button are not perfect, and it may take a little time for the circuit to fully close. This behavior is known as “bouncing.” As you can imagine, this is quite problematic. For instance, a keyboard might produce multiple characters in rapid succession with a single keypress. Correcting this behavior is called “debouncing,” and there are several approaches to achieve it, both through electrical and software means.
The simplest software solution involves waiting for a brief moment after reading the button. Then, if the button was in the HIGH state, read the button again. If the button is still in the HIGH state, the Arduino can be quite sure that it was indeed a genuine button press.
[code]
if (buttonread == HIGH) { //Check if Button was pressed before and being pressed now
delay(5);
if ((buttonState == LOW) && (digitalRead(buttonPin)) )
{
if (digitalRead(buttonPin)) {
// turn LED on:
digitalWrite(ledPin, HIGH);
buttonState = HIGH;
Serial.println("Button pressed");
}
}
}
[/code]
The exact duration of the wait depends on the specific situation and is not particularly critical. Typically, a delay of 5 to 50 milliseconds is sufficient.[:de]Wenn Sie einen Arduino mit einem Taster steuern möchten, stehen Sie vor der Herausforderung, den Taster richtig abzufragen und zu entprellen. Das Anschließen eines Tasters an den Arduino ist zwar einfach, aber die korrekte Erfassung der Tastendrücke erfordert spezielle Maßnahmen. In diesem Artikel werden wir Ihnen zeigen, wie Sie einen Taster mit dem Arduino verbinden und wie Sie Prellen effektiv verhindern können. Schauen wir uns gemeinsam an, wie Sie Ihren Arduino mithilfe eines Tasters steuern können.
Beim Auslesen von Tastern kommt es häufig zu einem Phänomen dass sich Prellen nennt. Dieses Prellen kann zu unerwünschten Effekten führen, wie mehreren Auslösungen eines Tastendrucks oder ungenauen Eingaben. Bevor wir uns aber damit genauer beschäftigen, lesen wir erst einmal einen Taster aus.
Zum Glück ist das Anschließen eines Tasters sehr einfach, und die Arduino-IDE bietet sogar einen vorgefertigten Sketch, den Sie unter
Beispiele -> 02.Digital -> Taster finden können.
Hier ist der Quellcode:
/*
Button

Turns on and off a light emitting diode(LED) connected to digital
pin 13, when pressing a pushbutton attached to pin 2.

The circuit:
* LED attached from pin 13 to ground
* pushbutton attached to pin 2 from +5V
* 10K resistor attached to pin 2 from ground

* Note: on most Arduinos there is already an LED on the board
attached to pin 13.

created 2005
by DojoDave http://www.0j0.org
modified 30 Aug 2011
by Tom Igoe

This example code is in the public domain.

http://www.arduino.cc/en/Tutorial/Button
*/

// constants won't change. They're used here to
// set pin numbers:
const int buttonPin = 2; // the number of the pushbutton pin
const int ledPin = 13; // the number of the LED pin

// variables will change:
int buttonState = 0; // variable for reading the pushbutton status

void setup() {
// initialize the LED pin as an output:
pinMode(ledPin, OUTPUT);
// initialize the pushbutton pin as an input:
pinMode(buttonPin, INPUT);
}

void loop() {
// read the state of the pushbutton value:
buttonState = digitalRead(buttonPin);

// check if the pushbutton is pressed.
// if it is, the buttonState is HIGH:
if (buttonState == HIGH) {
// turn LED on:
digitalWrite(ledPin, HIGH);
}
else {
// turn LED off:
digitalWrite(ledPin, LOW);
}
}
Neben einem Arduino braucht man natürlich noch einen Taster und einen Widerstand. Der Widerstand verbindet Pin 2 mit Masse und zieht die Spannung an dem Pin auf 0V. Wenn man den Taster betätigt wird der Pin an die Versorgungsspannung gelegt (5V) und die Spannung am Pin steigt quasi sofort auf 5V. Diese Spannung wird vom Arduino erkannt und kann über die Funktion digitalRead ausgelesen werden.
Zusätzlich zum Arduino benötigen Sie einen Taster und einen Widerstand. Der Widerstand verbindet Pin 2 mit Masse und zieht die Spannung an dem Pin auf 0V. Wenn Sie den Taster betätigen, wird der Pin an die Versorgungsspannung (5V) gelegt und die Spannung am Pin steigt quasi sofort auf 5V. Diese Spannung wird vom Arduino erkannt und kann über die Funktion digitalRead ausgelesen werden.
Der Sketch setzt Pin 2 in den Inputmodus und Pin 13 in den Outputmodus. An Pin 2 befindet sich der Taster und an Pin 13 ist auf dem Arduino bereits eine LED eingebaut. In der Loop-Schleife wird kontinuierlich über die Funktion digitalRead der Pin 2 überprüft. Die Variable buttonState wird dann auf 0 oder 1 gesetzt, je nachdem welchen Wert digitalRead zurückgibt. Wenn die Variable auf 1 gesetzt wird, wird die LED eingeschaltet, ansonsten wird sie ausgeschaltet.
Das funktioniert gut, aber es fehlt die Möglichkeit, zwischen An- und Aus-Zustand zu wechseln, wenn der Taster gedrückt wird.
Einzelne Tastendrücke
Um zu überprüfen, ob der Taster bereits gedrückt wurde, speichern wir dies in einer Variable. Hier ist ein Beispiel:
/*
Button

Turns on and off a light emitting diode(LED) connected to digital
pin 13, when pressing a pushbutton attached to pin 2.

The circuit:
* LED attached from pin 13 to ground
* pushbutton attached to pin 2 from +5V
* 10K resistor attached to pin 2 from ground

* Note: on most Arduinos there is already an LED on the board
attached to pin 13.

*/

// constants won't change. They're used here to
// set pin numbers:
const int buttonPin = 2; // the number of the pushbutton pin
const int ledPin = 13; // the number of the LED pin

// variables will change:
int buttonState = LOW; // variable for reading the pushbutton status
int buttonread = 0;

void setup() {
// initialize the LED pin as an output:
pinMode(ledPin, OUTPUT);
// initialize the pushbutton pin as an input:
pinMode(buttonPin, INPUT);
Serial.begin(9600);
}

void loop() {
// read the state of the pushbutton value:
buttonread = digitalRead(buttonPin);

// check if the pushbutton is pressed.
// if it is, the buttonState is HIGH:
if (buttonread == HIGH) { //Check if Button was pressed before and being pressed now

if (buttonState == LOW)
{
// turn LED on:
digitalWrite(ledPin, HIGH);
buttonState = HIGH;
Serial.println("Button pressed");
}
}
else {
if (buttonState == HIGH) {
digitalWrite(ledPin, LOW);
buttonState = LOW;
}
}
}
Zu Beginn wird buttonState mit LOW initialisiert. Diese Variable speichert, ob der Taster bereits gedrückt wurde (LOW zeigt an, dass noch nicht gedrückt wurde). Wenn der Taster gedrückt wird, wird die LED eingeschaltet und eine Meldung über den Serial Port ausgegeben. Auch beim Loslassen des Tasters bleibt die LED an.
Allerdings können mehrere Nachrichten über die serielle Schnittstelle auftreten, obwohl der Taster nur einmal gedrückt wurde. Dieses Verhalten sollte nicht auftreten, selbst wenn der Taster gedrückt gehalten wird.
Das obige Bild z.B. ist nach einem einzigen Tastendruck. Was ist passiert?
Prellen
Beim Betätigen des Tasters schließt man den Stromkreis, aber dies geschieht nicht sofort. Die mechanischen Bauteile im Taster sind nicht perfekt, und es kann eine Weile dauern, bis der Stromkreis vollständig geschlossen ist. Dieses Verhalten wird als “Prellen” bezeichnet. Um dieses Verhalten zu korrigieren, muss der Taster “entprellt” werden. Es gibt verschiedene Ansätze, sowohl elektrisch als auch softwaretechnisch.
Eine einfache Softwarelösung besteht darin, nach dem Einlesen des Tasters einen kurzen Moment zu warten und dann, falls dieser HIGH war, den Taster noch einmal einzulesen. Wenn der Taster immer noch auf HIGH ist, kann der Arduino sicher sein, dass es ein echter Tastendruck war.
if (buttonread == HIGH) { //Check if Button was pressed before and being pressed now
delay(5);
if ((buttonState == LOW) && (digitalRead(buttonPin)) )
{
if (digitalRead(buttonPin)) {
// turn LED on:
digitalWrite(ledPin, HIGH);
buttonState = HIGH;
Serial.println("Button pressed");
}
}
}
Wie lange man genau warten muss, hängt von Fall zu Fall ab und ist nicht besonders kritisch. Für gewöhnlich reichen 5 bis 50 Millisekunden.[:]
